The Best Free Video Editing Software For Churches
Serving in a church means working with limited resources. This often forces us to look for free tools.
Here’s the problem:
Sure, free solutions exist. But they often aren’t very good.
Thankfully, I’ve got good news for you:
DaVinci Resolve is the best free editing software for churches. It’s robust. It comes equipped with industry-leading tools and features. It works on every operating system. You can render compositions up to 4K in resolution without any watermarks. And it’s 100% free – no strings attached.
Ready to learn more?
Let’s do this 💪
{{banner-1}}
What Is DaVinci Resolve? (and why is it free?!)
Nothing comes free in this life – except DaVinci Resolve.
Well, that’s not entirely true. There are some other free video editing programs out there like Blender, iMovie, and Shotcut (among others).
But I wouldn’t recommend those options. Here’s why:
Simply put, learning new software can be a hassle. So starting with an editor that is free (but limited) may be helpful in the short-term, but aggravating in the long-term.
Because when you’re ready to graduate to a more capable tool, you’ll need to restart the learning process all over again.
And when I’m choosing what to buy and where to invest, there’s a principle I frequently bring to mind:
“Buy cheap, buy twice“
And this doesn’t just pertain to video editing software, but basically any purchase in life. Because for me, I’d much rather save up and buy something that will last – than buy cheap and end up buying twice.
What makes Resolve special?
DaVinci Resolve is the most affordable solution for your church. Remarkably, it’s also the best solution.
Because Resolve is one of the rare cases where you’re not actually required to choose between the cheapest tool and the best tool – because in this case, they’re one and the same.
Now, with that being said, it’s important to know that there are two different versions of DaVinci Resolve:
- DaVinci Resolve (Cost: $0 USD)
- DaVinci Resolve Studio (Cost: $299 USD)
The cost for DaVinci Resolve Studio version is $299 USD. And that one-time payment gives you a lifetime license to the platform. No subscriptions here.
*cough* Adobe 🙄 *cough*
Now, you might be wondering…
Does this mean the free version of Resolve is one of those free versions of software that is severely limited compared to the paid version – so much so that it’s almost forcing you to upgrade?
No. The free version is fully capable.
So what isn’t included in the free version?
- Certain motion blur effects
- Built-in noise reduction
- The ability to edit compositions greater than 4K resolution
- Built-in film grain
- Find the full comparison list here
Basically, the features reserved for DaVinci Resolve Studio are the ones that you might only need when you’ve progressed to higher levels of video editing. But nothing you’ll really miss when you’re a beginner or intermediate editor.
And if you are a more experienced editor – that $299 cost for a lifetime license is an easy decision in my mind.
And this is why I actually moved away from Adobe Premiere Pro, the tool I had been using for the past seven years, and am now editing exclusively in DaVinci Resolve.
There was even an in-between period where I edited a number of projects in Final Cut Pro X. But Resolve emerged as the clear winner.
Bottom line:
In my team’s transition, we haven’t found a single thing that Final Cut or Premiere could do that Resolve cannot.
Plus, there are a few things about Resolve that just don’t exist in these other applications (more on that later).
{{banner-2}}
DaVinci Resolve Quick Start Guide
Now let’s run through a quick intro to Resolve. I’ll then show you my preferred export settings – along with a few pro tips I’ve picked up while using Resolve to get you started off right.
Project Manager
Every time you open Resolve you’ll be presented with the Project Manager and this is how all of your different videos get organized.
IMPORTANT: You’ll want to create a new Project for each video (or series of videos) you’re working on.
Moreover, make sure to organize your different projects in folders to keep your Project Manager neatly organized – otherwise, it’ll get cluttered fast.
*This isn’t just for certain personality types (of which I am clearly type A) but it’s an essential practice for keeping your working projects organized and maintaining a workable archive*
Once your project is created it’s time to get acquainted with the project panels. Resolve has a dedicated panel for each stage of your edit. And there are seven panels in total.
#1. Media
We start with the Media panel. Here you can import the different files you’ll need for your edit.
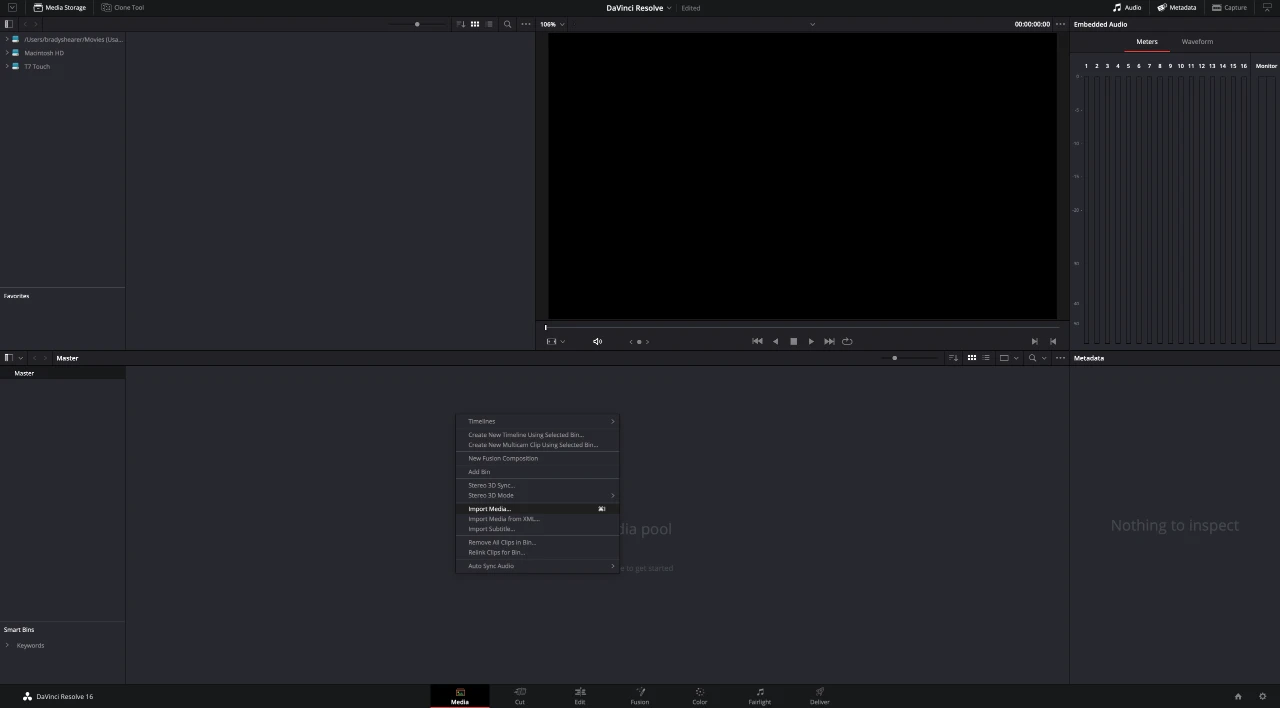
Pro Tip: Get familiar with shortcuts (in this case CMD+I) to make your workflow as efficient as possible. Hitting that shortcut will open the import window automatically and save you a few clicks of the mouse! And if you’re coming from a previous editor, you can actually configure your shortcuts in Resolve to match those of another major NLE like Premiere Pro, Final Cut, Avid, etc.
#2. Cut
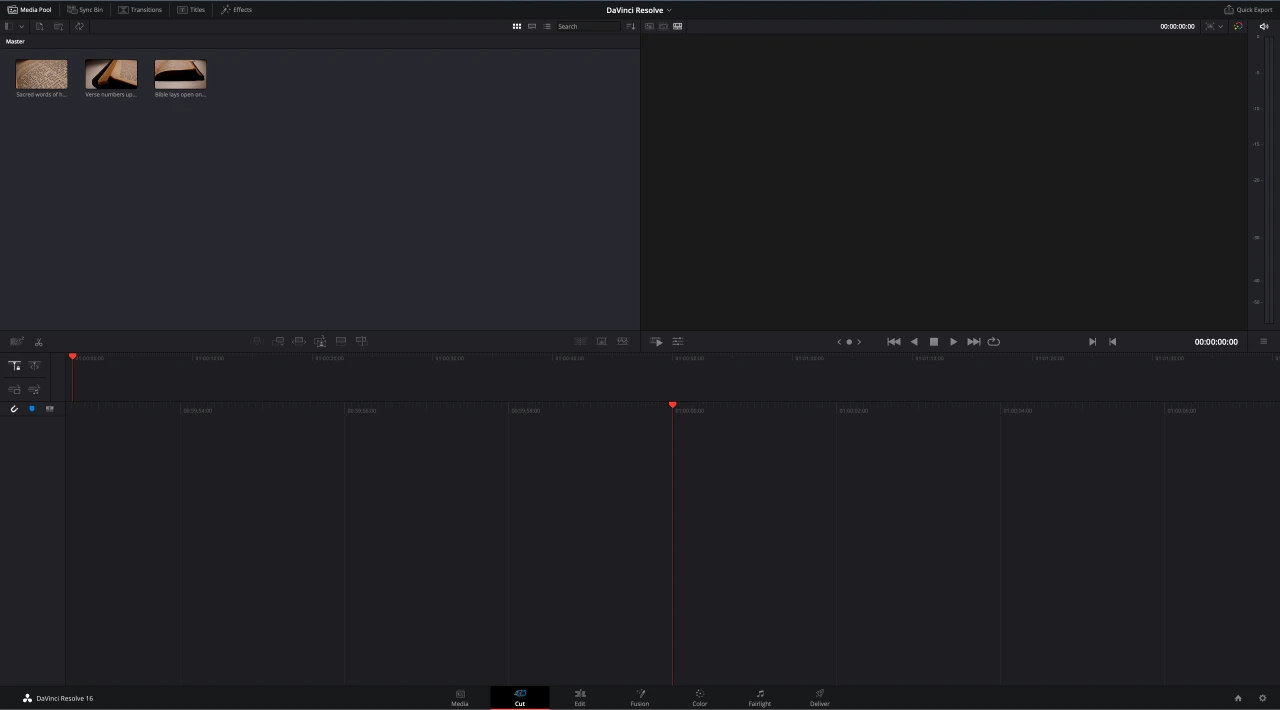
The Cut panel is where you can sync audio with video and prepare your media for editing. Admittedly, I don’t use this panel too often, but I spend a ton of time in the next one.
#3. Edit
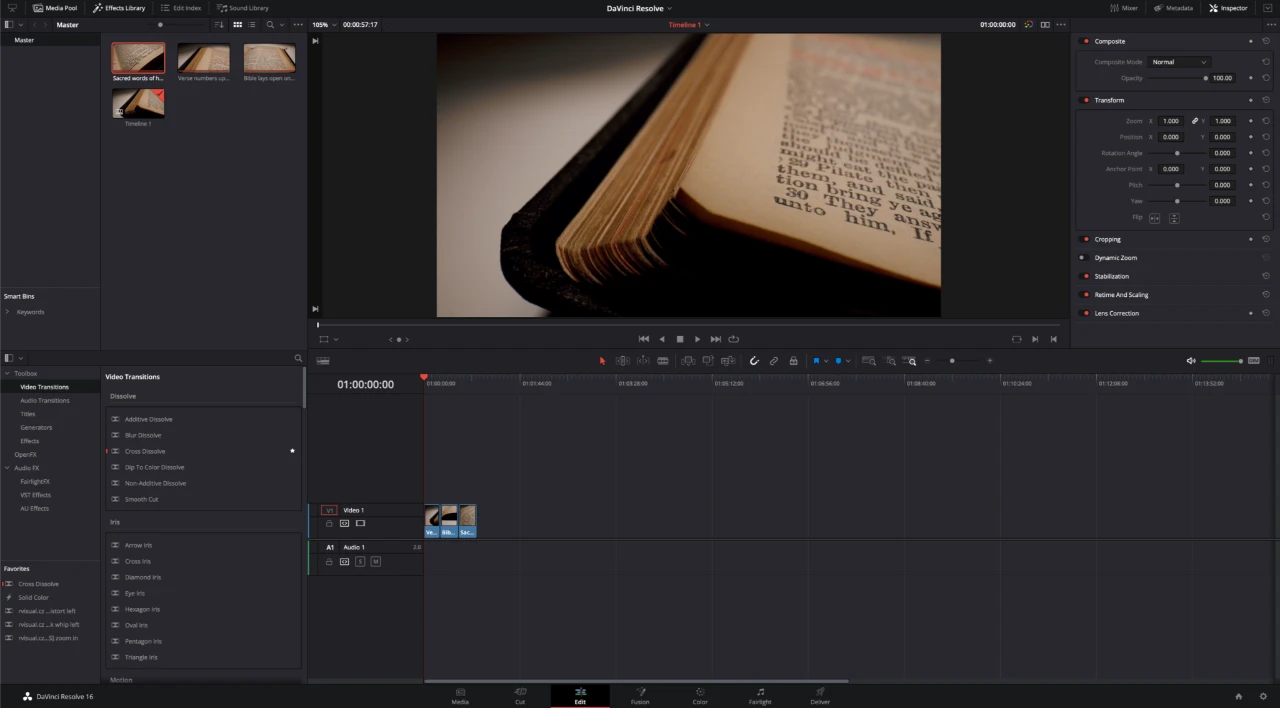
The Edit panel is where you’ll find your video’s timeline and cut and piece together your edit. This is where you’ll spend most of your time editing and regardless of what video editor you’re migrating from, most of the elements here should be familiar.
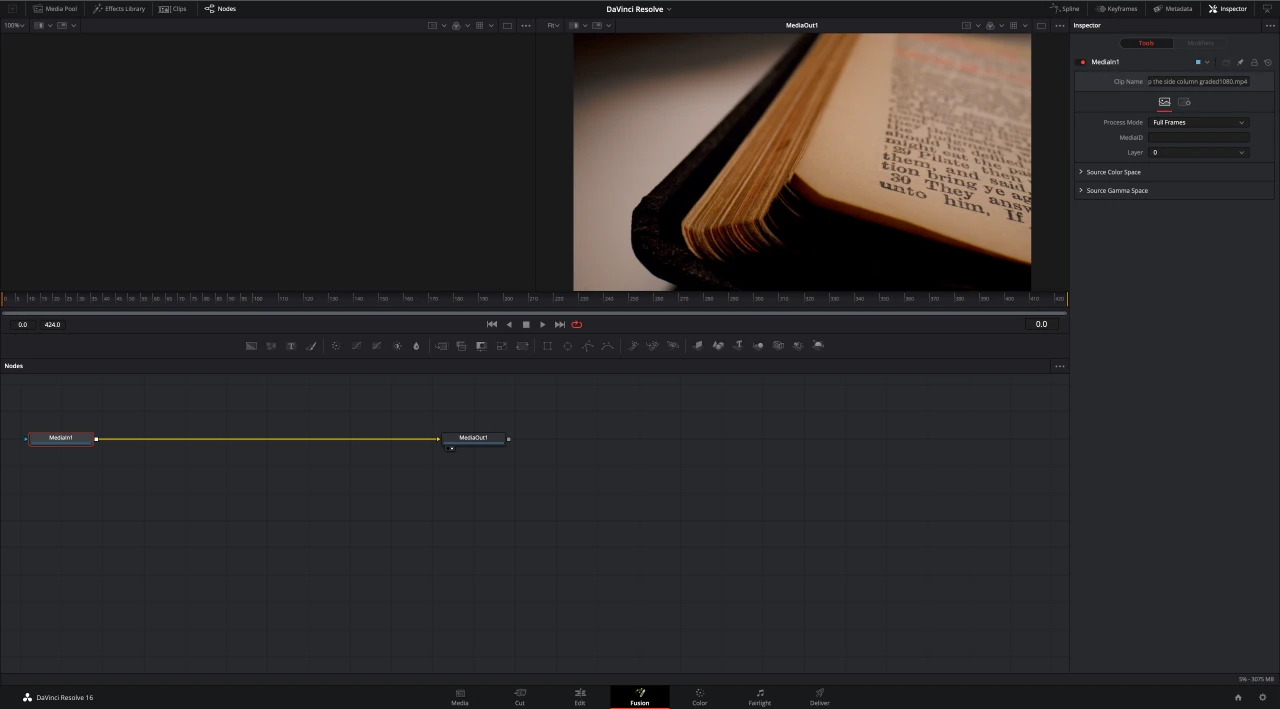
#4. Fusion
Moving on we find the Fusion Panel. This entire panel is dedicated to motion graphics and visual effects. This is Resolve’s answer to After Effects – and it’s incredibly capable and advanced if you choose to use it.
#5. Color
Next up is the Color Panel. Here all of your color correction and color grading takes place. Coloring is Resolve’s original claim to fame. In fact, before you could ever edit full projects in Resolve, it was the go-to tool in many Hollywood productions for coloring.
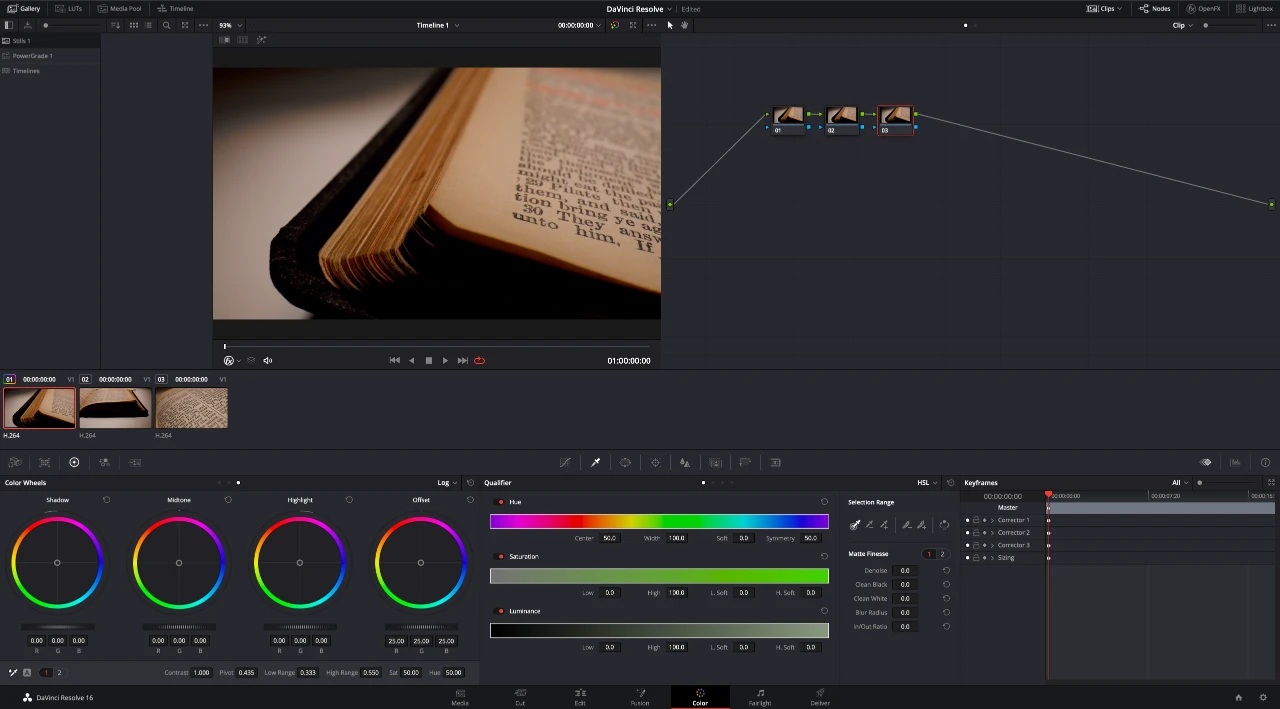
Now, Resolve can do it all!
And if you’re interested in learning more about color grading and color correction in Resolve? Below I’ve got two deep-dive videos on how I color my projects:
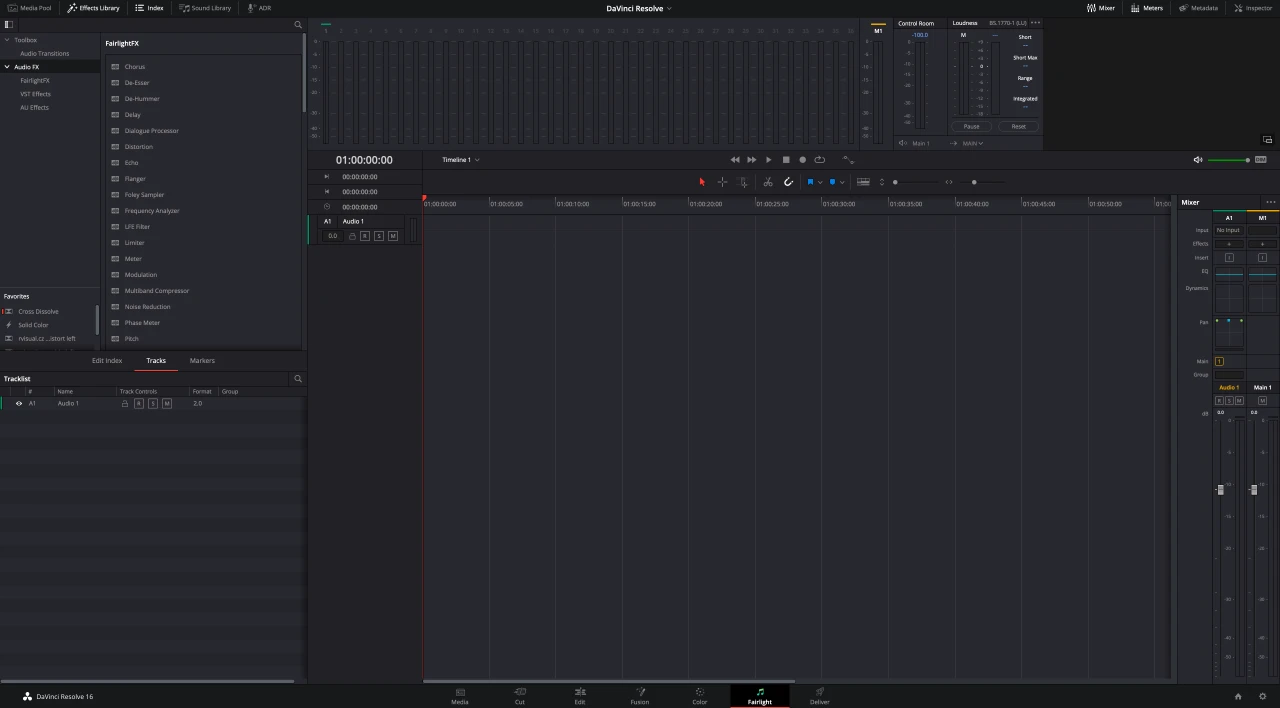
#6. Fairlight
Once we’re done in the color panel we move to Fairlight. This is where all of your audio post-processing takes place.
#7. Deliver
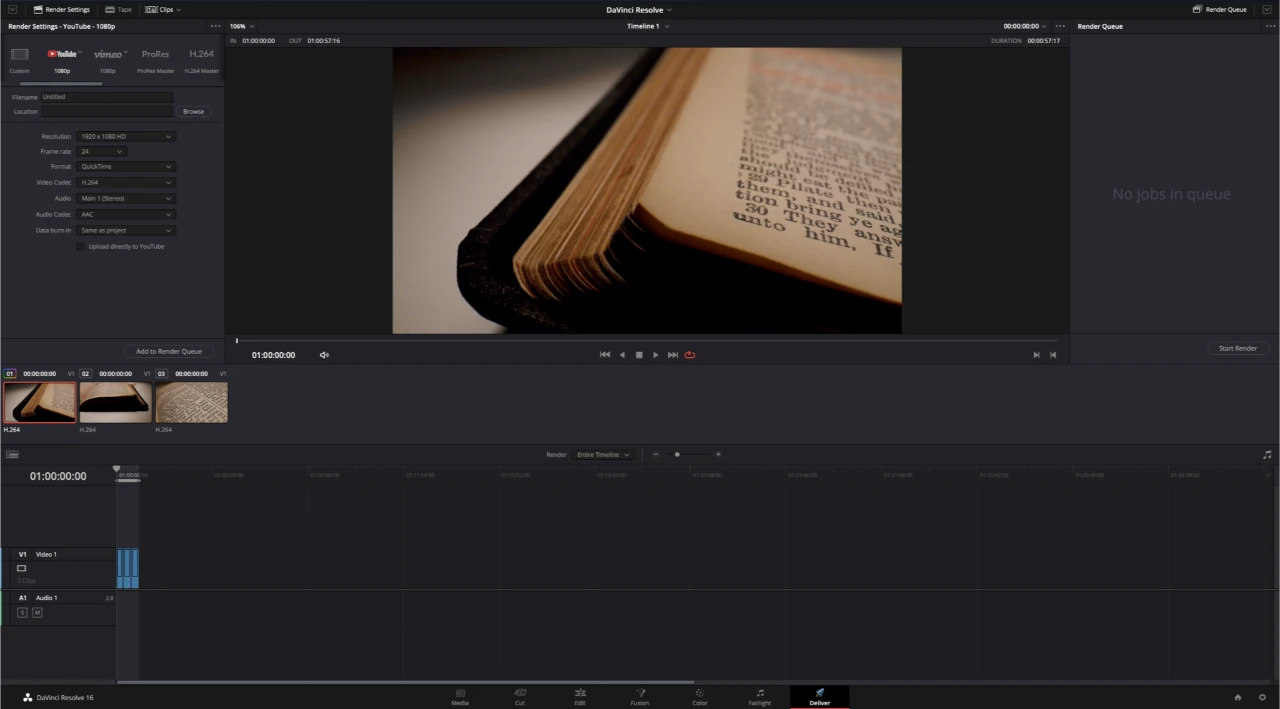
Lastly, the Deliver panel is where you export your video.
Now, if you’re familiar with the process of editing and exporting a video, you may have experienced the dreaded color/saturation shift that sometimes happens when you export.
You know the feeling…
You’ve got your video where you want it, looking great on your monitor, and then you export the video to share online, but when you go to watch the exported version it’s nothing like what you saw on the timeline.
This problem is compounded by the fact that once you upload your video to an online platform (Example: YouTube) it’s going to be compressed even further.
How do we avoid this?
Below you’ll find my personal export settings I use in DaVinci Resolve to avoid this problem altogether.
The Best DaVinci Resolve Export Settings
In the Deliver panel, begin by making sure these settings are selected:
- Format – QuickTime ✅
- Codec – H.264 ✅
- Quality – Restrict to 80,000 Kb/s (for 4K); Restrict to 40,000 Kb/s (for 1080p) ✅
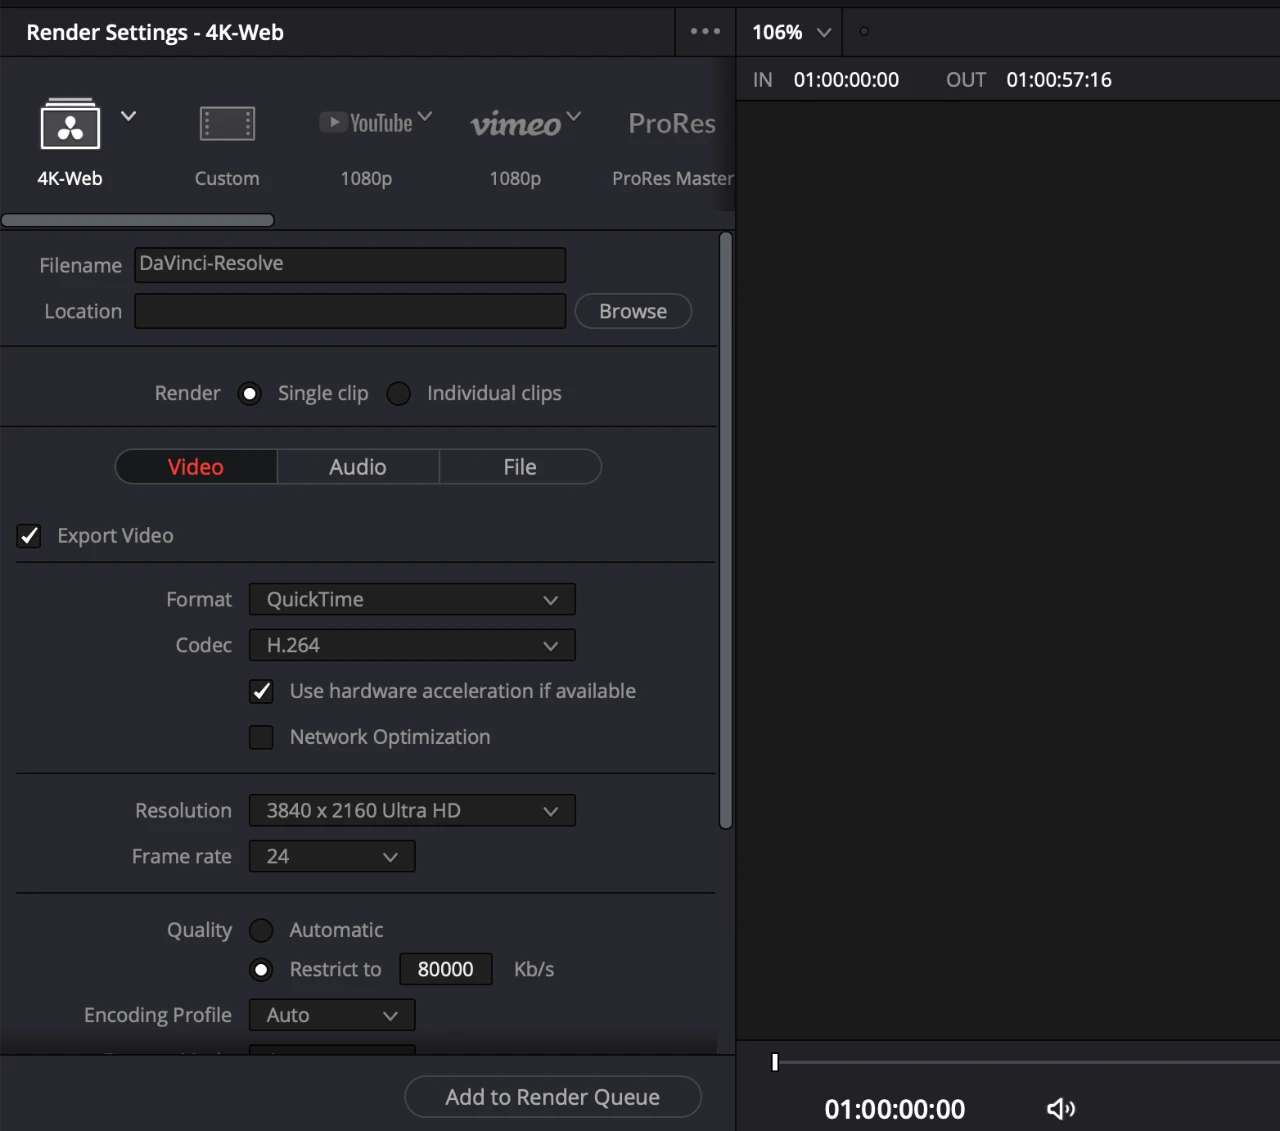
Next, open up the Advanced Settings dropdown menu and make the following adjustments:
- Color Space Tag – P3-D65 ✅
- Gamma Tag – sRGB ✅
- Force sizing to highest quality ✅
- Force debayer to highest quality ✅
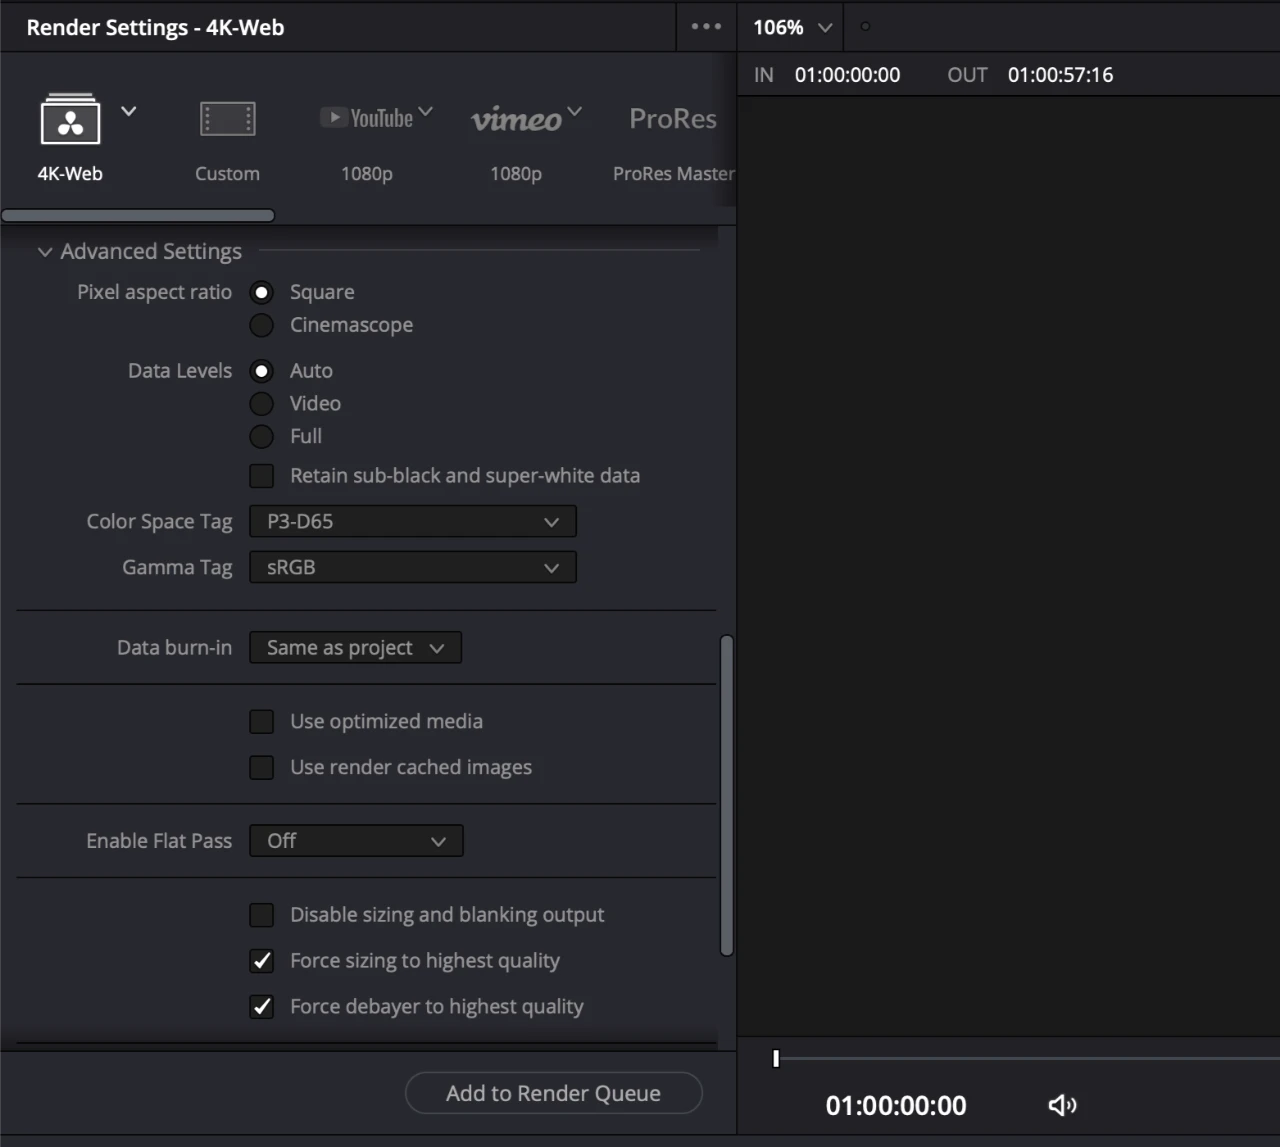
And that’s it!
Now, I’d recommend saving these new settings as a preset by clicking the three dots in the upper right-hand corner of the Render Settings window.
One last thing that sets Resolve apart…
With most video editors, you’ll need to pay for/download a number of different third-party plugins.
In Resolve, however, many of these tools are built into the platform with no additional purchase or installation required! Here are a few of my favorites.
NOTE: Some of these are only available in DaVinci Resolve Studio
Film Grain
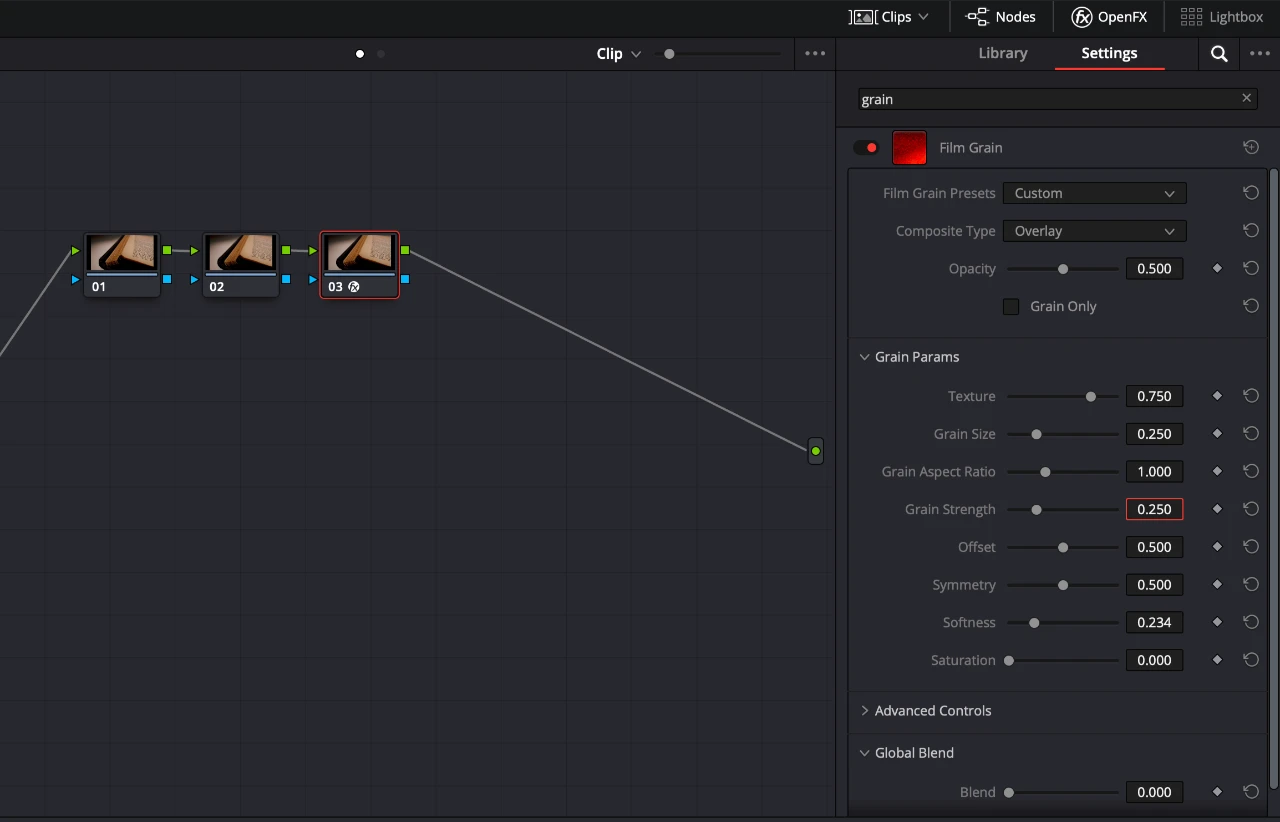
In the Color panel, if you go to OpenFX in the top-right corner and type in Grain, you’ll find Resolve’s built-in Film Grain effect. You can drag this effect onto any clip you’d like and choose from a variety of film grain presets.
If you wanted to do something like this in Premiere Pro or Final Cut, you’d need to pay for a third-party plugin.
Here are my preferred grain settings:
- Film Grain Preset – 35mm 400T
- Grain size – between 0.2 and 0.3
- Gain strength – between 0.2 and 0.3
Noise Reduction
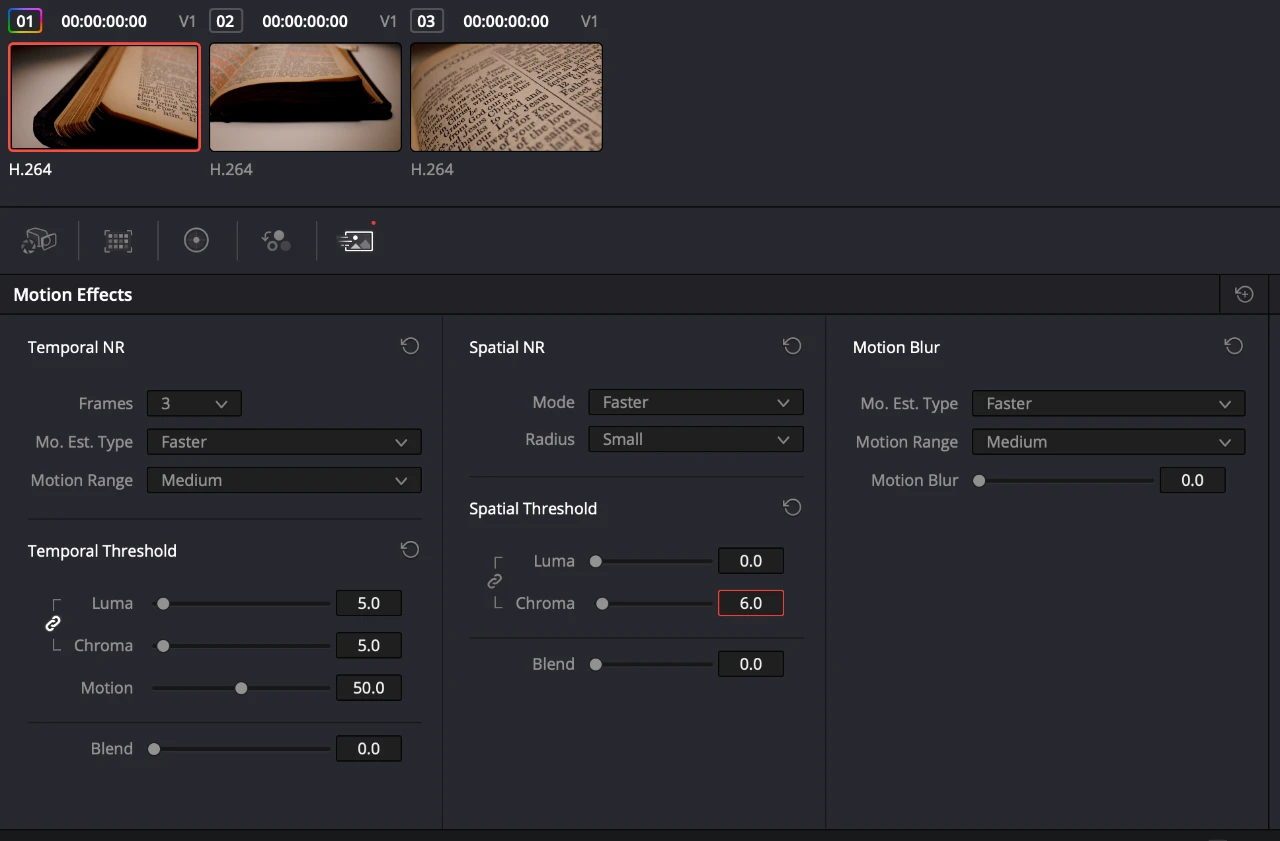
The noise reduction in Resolve Studio is also outstanding. A good starting point for getting rid of a ton of the digital noise you’ll find in most cameras is to use these settings 👇
- Frames – 3
- Temporal Threshold – 5
- Spatial Threshold – click on chain to unlink and then set Chroma to 6
At the risk of repeating myself, remember this:
Compared to another platform like Premiere Pro or Final Cut, a plugin like Neat Video – which has been the standard for noise reduction for years – costs around $100. You don’t need that third-party tool with Resolve though, because Resolve’s noise reduction is baked right in.
LUTs
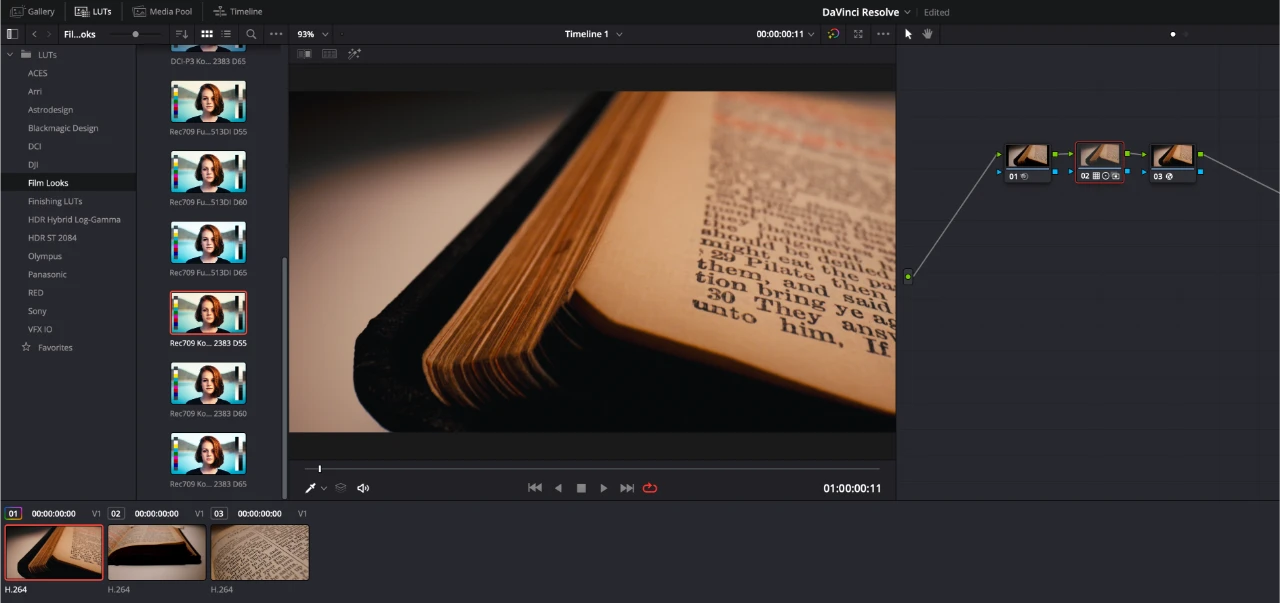
Let’s talk about LUTs. Resolve has baked-in film emulation LUTs that will take your digital footage and translate the colors to be closer to film. If you navigate to the LUTs tab in the upper left while in the Color panel, you can choose the folder that says Film Looks to see every LUT available right within Resolve. These can serve as an excellent starting point (or finishing touch) for a ton of creative looks.
Can my computer handle this?
Now, at this point you might be thinking, “Well, Resolve looks like it can do a lot – I don’t know if my computer can handle this.”
That’s a very important consideration for me, too.
In fact, the main reason I decided to leave Adobe Premiere Pro this year was that I had lost the joy of editing videos because of Premiere’s lagging and constant crashing – even with a number of different capable computers.
What I love most about Resolve in regards to performance is that there are a number of different steps you can take to allow Resolve to run smoothly on your computer, even if your computer is older or not especially powerful.
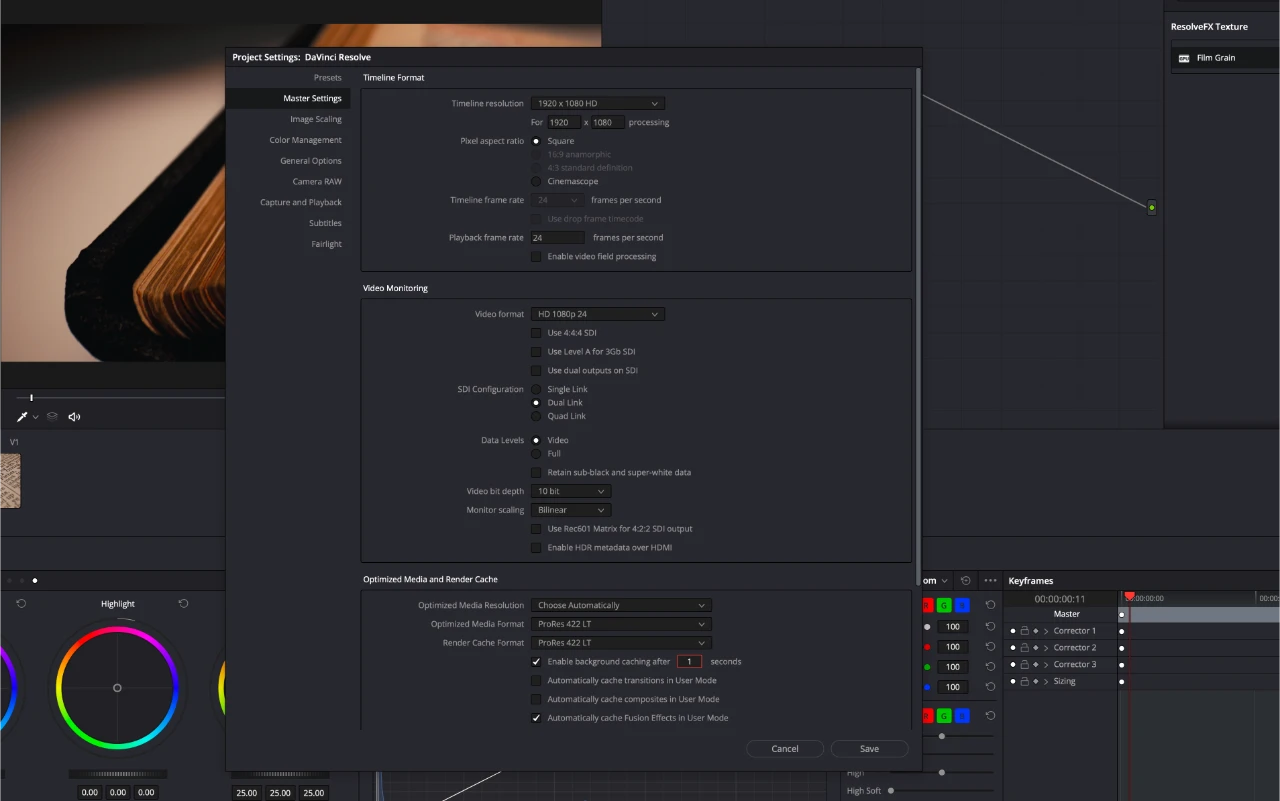
The first thing you can do is go to your project settings by clicking the gear icon in the bottom right corner of your screen and then in the Master Settings tab find the Optimized Media and Render Cache section.
Here, you’ll want to make sure that your media format and cache format are both set to ProRes LT if you’re on a Mac or to DNxHR SQ if you’re on a PC.
You’ll also want to change your background caching from five seconds to one second and then press save.
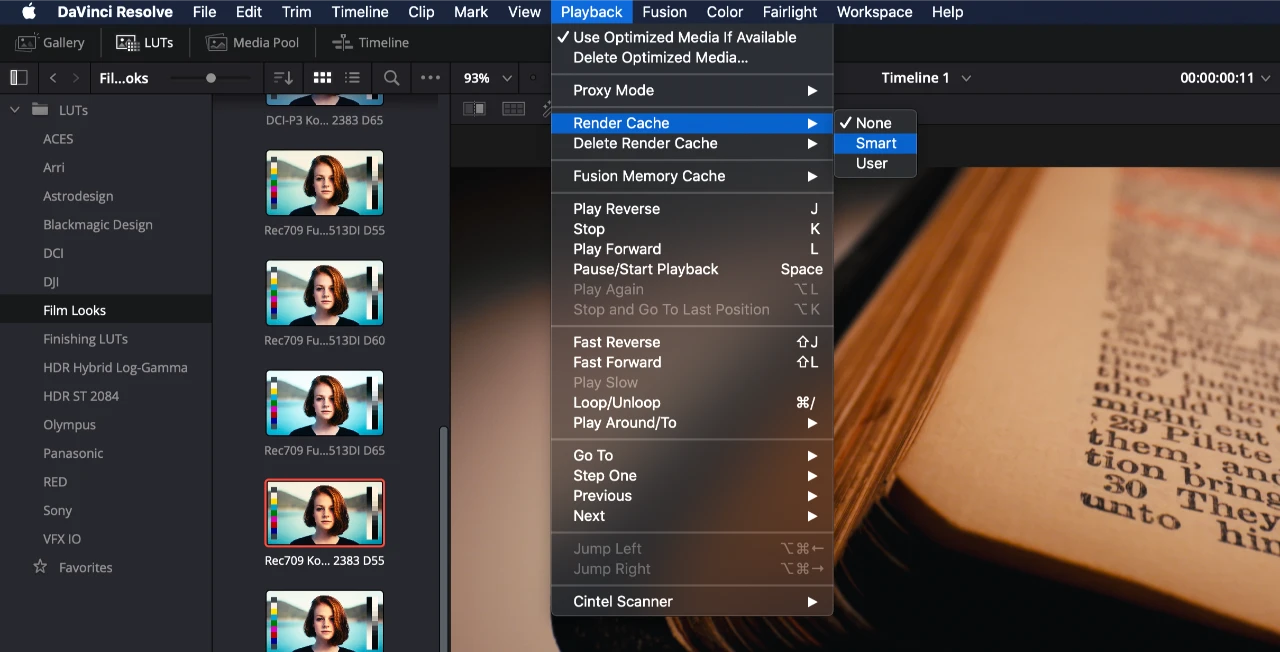
Then under the Playback dropdown menu, make sure ‘Use optimized media if available’ is checked and active. Under that same dropdown, go to Render Cache and then activate the ‘Smart’ setting.
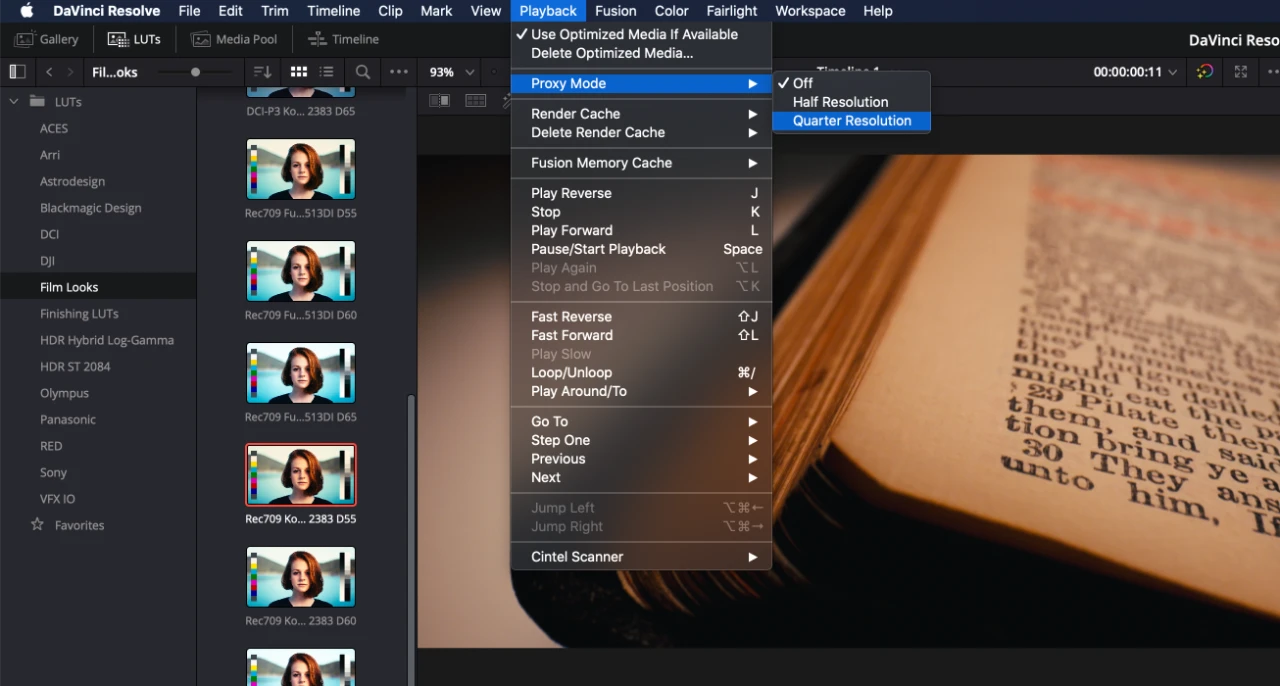
Finally, under that same Playback dropdown, you can also go to Proxy Mode and then choose ‘Half Resolution’ or ‘Quarter Resolution.’
Has your computer fan calmed down yet? 😅
All of these adjustments should make a considerable difference for you. If, however, you still aren’t getting smooth playback as you want, you’re going to need to take more control yourself.
Remember, when we selected ‘Smart’ under the ‘Render Cache’ setting? Basically, that gives Resolve the control of optimizing what it thinks needs to be optimized to ensure a smooth editing experience. And usually, that works for me.
Now all that’s left to do is to go to the clip on your timeline that’s giving you trouble and not playing back smoothly, right-click it, and select ‘Generate Optimized Media’.
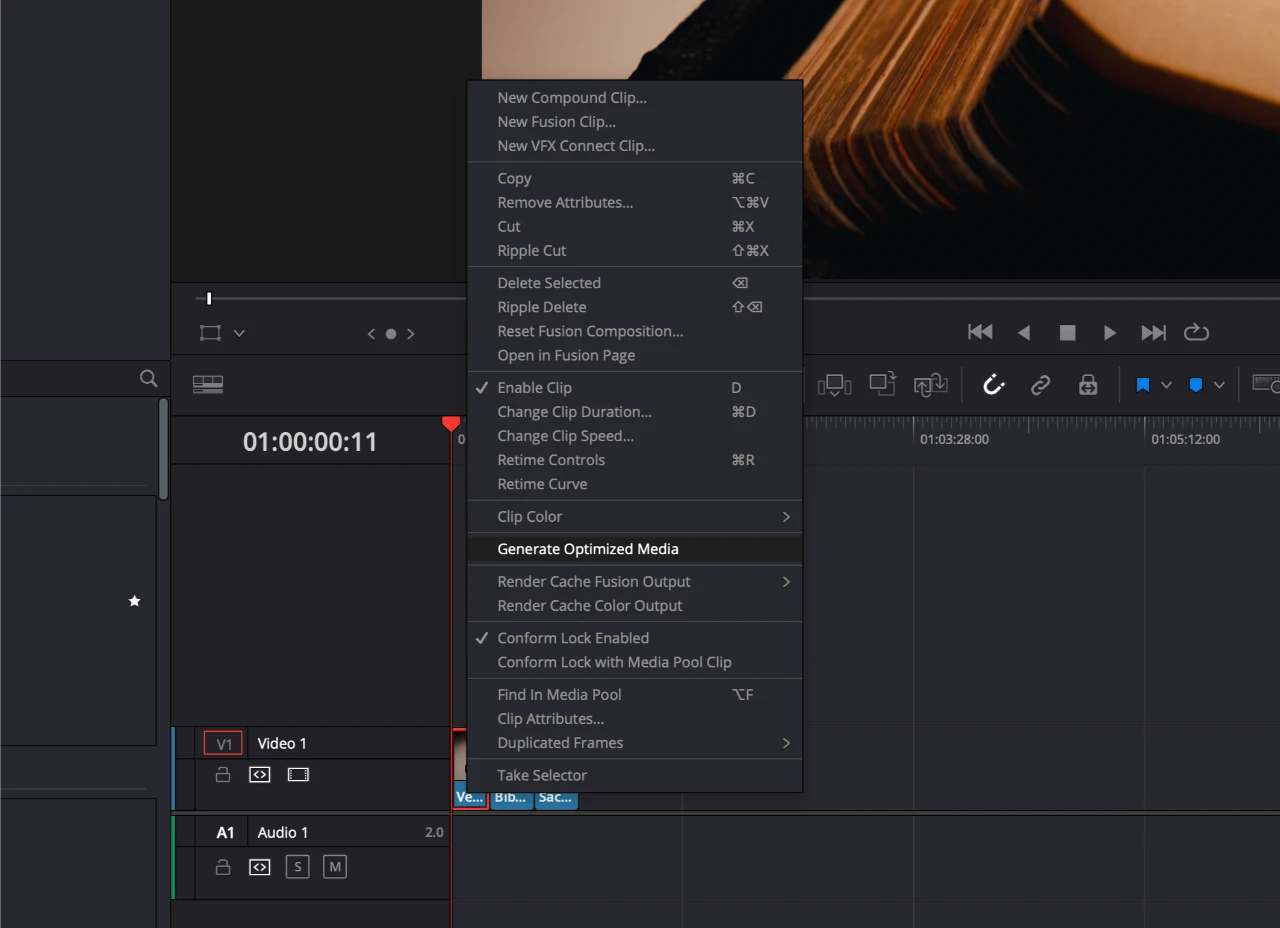
This Generate Optimized Media process may take a few moments. But after the process is complete, you should get smooth playback of that individual clip. Now, simply repeat that step for all of the clips that are giving you trouble.
One more tip…
There’s one more step to smooth playback to consider. If you have added a number of coloring effects, stabilization, grain, noise reduction, etc. you’re going to find your playback smoothness is compromised no matter how powerful your machine may be.
In this case, go back to your clip in the Edit panel after you’ve added all of those effects and follow this process:
- Right-click on the clip
- Select ‘Render Cache Color Output’
NOTE: Keep in mind, if you go and tweak the settings again you’ll need to repeat this process.
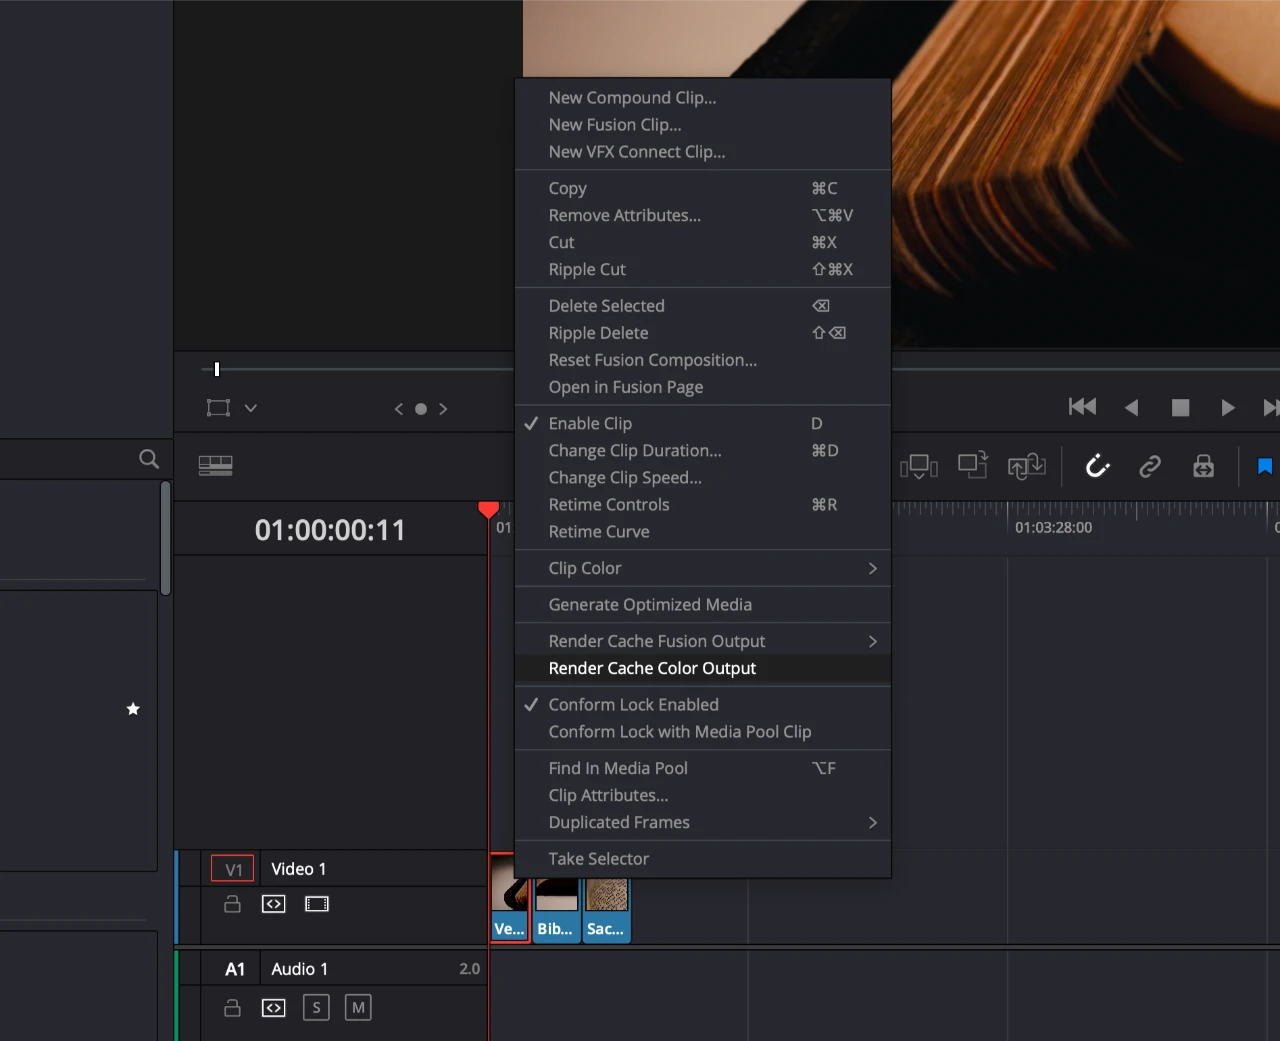
I know that’s a lot of steps, but what I love about this is that Resolve has made it possible to do heavy edits on so many different machines regardless of their hardware or operating systems. And for me, this brought so much of the joy back into editing.
Keep learning
Well that’s it friends – the best free editing software for you to use for your creative projects at church. If you want to dig in and keep learning, make sure to watch these two videos on my coloring techniques in Resolve 🎨
{{banner-3}}
Download The iPhone Church Photography Case Study – learn to shoot stunning photos for your church with only your phone.
Download The iPhone Church Photography Case Study – learn to shoot stunning photos for your church with only your phone.
Download The iPhone Church Photography Case Study – learn to shoot stunning photos for your church with only your phone.
Keep Reading
